4. Creating a Custom Taskpad View
A taskpad view is a custom configuration of the MMC
results (right) pane for a given snap-in. By default, the results pane
shows a list of the snap-in’s contents—for example, the list of
categories and devices in the Device Manager snap-in and the list of
installed services in the Services snap-in. However, you can customize
this view with one or more tasks that run commands defined by the
snap-in, or any program or script that you specify. You can also control
the size of the list, whether the list is displayed horizontally or
vertically in the results pane, and more.
Here are the steps to follow to create a custom taskpad view:
1. | Select a snap-in in the tree pane, as follows:
If you want to apply the taskpad view to a specific snap-in, select that snap-in. If
you want to apply the taskpad view to a group of snap-ins that use the
same snap-in type, specify one snap-in from the group. For example, if
you want to customize all the folders, select any folder (such as the
Console Root folder); similarly, if you want to customize all the Link
to Web Address snap-ins, select one of them.
| 2. | Select Action, New Taskpad View to launch the New Taskpad View Wizard.
| 3. | Click Next to open the Taskpad Style dialog box, shown in Figure 3.
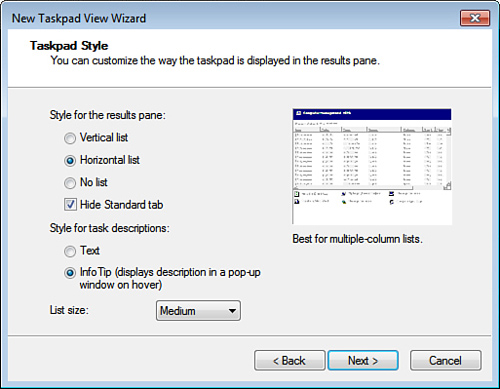
| 4. | Use the following controls to set up the style of taskpad you want:
- Style for Results Pane—
Select an option for displaying the snap-in’s results: Vertical List
(this is best for lists with a large number of items), Horizontal List
(this is best for web pages or lists with a large number of columns), or
No List (choose this option if you want only tasks to appear in the
results pane).
- Hide Standard Tab—
After you create the new taskpad view, the MMC displays two tabs in the
results pane: The Extended tab shows your custom taskpad view, and the
Standard tab shows the default view. To keep the option of displaying
the default view, deactivate the Hide Standard Tab check box.
- Style for Task Descriptions—
When you add descriptions for your tasks later on, you can have the MMC
display each description either as text below the task link or as an
InfoTip that appears when you hover the mouse over the task link.
- List Size—
Choose the size of the list: Small (good if you add lots of tasks),
Medium (this is the default), or Large (good if you have few or no
tasks).
| 5. | Click Next. The Taskpad Reuse dialog box appears.
| 6. | The
wizard assumes that you want to apply the new taskpad view to all
snap-ins of the same type. If you only want to apply the taskpad view to
the current snap-in, select the Selected Tree Item option.
| 7. | Click Next. The Name and Description dialog box appears.
| 8. | Type a name and optional description for the taskpad view, and then click Next. The final wizard dialog box appears.
| 9. | If you don’t want to add tasks to the new view, deactivate the Add New Tasks to This Taskpad After the Wizard Closes check box.
| 10. | Click Finish. If you elected to add tasks to the view, the New Task Wizard appears.
| 11. | Click Next. The Command Type dialog box appears.
| 12. | Select one of the following command types:
- Menu Command— Select this option to create a task that runs an MMC or snap-in menu command.
- Shell Command— Select this option to create a task that runs a program, script, or batch file.
- Navigation— Select this option to create a task that takes you to another snap-in that’s in your MMC Favorites list.
Note
To add a snap-in to the MMC Favorites list, select the snap-in in the tree pane and then select Favorites, Add to Favorites.
| 13. | Click Next.
| 14. | How you proceed from here depends on the command type you selected in step 12:
- Menu Command— In the Menu
Command dialog box, first select an item from the Command Source list.
Choose Item Listed in the Results Pane to apply the command to whatever
item is currently selected in the results pane; choose Node in the Tree
to select a command based on an item in the MMC tree pane.
- Shell Command—
In the Command Line dialog box, use the Command text box to specify the
path to the program executable, script, or batch file that you want the
task to run. You can also specify startup Parameters, the Start In
folder, and a Run window type.
- Navigation— In the Navigation dialog box, select the items from the MMC Favorites list.
| 15. | Click Next. The Name and Description dialog box appears.
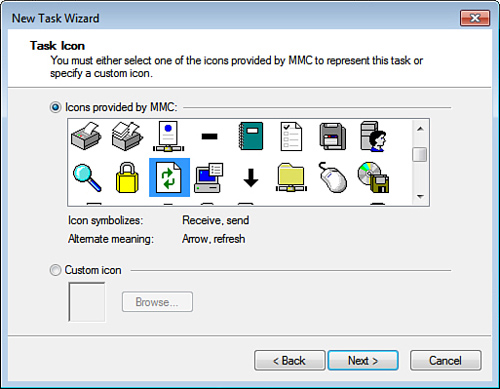
| 16. | Edit the task name and description, and then click Next. The Task Icon dialog box appears, as shown in Figure 4.
| 17. | Click Next. The final New Task Wizard dialog box appears.
| 18. | If you want to add more tasks, activate the When I Click Finish, Run This Wizard Again check box.
| 19. | Click Finish.
| 20. | If you elected to add more tasks, repeat steps 11 through 19, as needed.
|
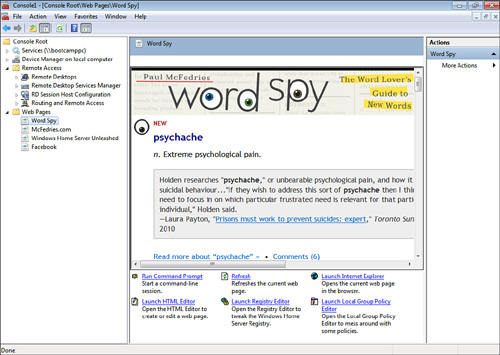
Figure 5 shows the MMC with a custom taskpad view applied to a Link to Web Address snap-in.
5. Controlling Snap-Ins with Group Policies
If
you share Windows Home Server with other people, you can control which
snap-ins they’re allowed to use, and you can prevent users from adding
snap-ins to the MMC.
The latter is the simpler of the two options, so let’s begin with that. The MMC has an author mode
that enables you to add snap-ins to it. If you prevent the MMC from
entering author mode, you prevent users from adding snap-ins. You can do
this using a group policy.
Note, too, that this policy prevents users from entering author mode
for those snap-ins that can be opened directly (from the Run dialog box,
from the command line, from Administrative Tools, and so on). Here are
the steps to follow:
1. | Open the Local Group Policy Editor window.
| 2. | Navigate to the User Configuration, Administrative Templates, Windows Components, Microsoft Management Console branch.
| 3. | Double-click the Restrict the User from Entering Author Mode policy.
| 4. | Activate the Enabled option.
| 5. | Click OK.
|
Rather than blocking off the MMC entirely, you might
prefer to allow users access only to specific snap-ins. Here are the
steps to follow:
1. | Open the Local Group Policy Editor window.
| 2. | Navigate to the User Configuration, Administrative Templates, Windows Components, Microsoft Management Console branch.
| 3. | Double-click the Restrict Users to the Explicitly Permitted List of Snap-Ins policy.
| 4. | Activate the Enabled option.
| 5. | Click OK.
| 6. | Navigate
to the User Configuration, Administrative Templates, Windows
Components, Microsoft Management Console, Restricted/Permitted Snap-Ins
branch.
| 7. | Double-click a snap-in that you want users to access.
| 8. | Activate the Enabled option.
| 9. | Click OK.
| 10. | Repeat steps 7 through 9 for each snap-in that you want users to access.
|
|